Process Monitoring During Open‐die Forging
Anyone who wants to produce curved or twisted steel and aluminium components, can rely on bending forging nowadays. Components with complex geometries can now be manufactured by means of this incremental forging variant.

So far, however, there has been no reliable process stability at this point. The Institute of Metal Forming (IBF) at RWTH Aachen University has developed an assistance system that eliminates this weak point. The temperature measurement on the surface of the processed metals during the forging process by means of an infrared camera plays an important role here.
InfraTec Solution
RWTH Aachen
Institute of Metal Forming (IBF)
www.ibf.rwth‐aachen.de
Infrared camera
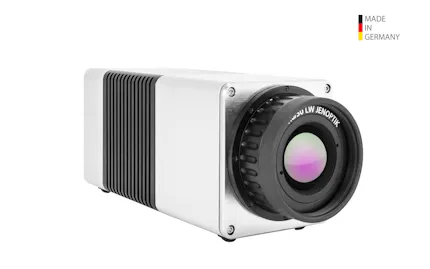
VarioCAM® HD head 800
Historical Shortcoming Compensated
Open‐die forging encompasses a series of different forming processes. What they all have in common is the fact that the final shape of the metal workpiece, which usually has been heated to well over 1,000 °C, does not result from the shape of the tool. An often geometrically simple tool is usually moved relatively to the workpiece and reshapes the workpiece locally through repeated punches. The whole process occurs gradually, i.e. incrementally. Companies use open‐die forging to produce semi‐finished products from cast ingots. This offers the enormous advantage of specifically influencing material properties and shapes. However, thanks to the process, cavities and pores that have formed after the casting can also be closed. Much of what occurred in the production halls in the past was largely based on experience. Given the absence of backed‐up data and parameters, the results sometimes fluctuated greatly regarding the quality of the products. In total, even small, added up deviations could mean that entire components did not meet the requirements.
At the same time, open‐die forging faces requirements that are well known from many industrial processes. Energy, time and thus costs should be saved and resources used optimally. In particular, this means using the available heat as efficiently as possible, creating optimised pass schedules and reducing the heating duration. Such projects will only succeed if the process can run in a much more stable manner.
Assistance System Records the Geometry, Temperature and Microstructure of Components
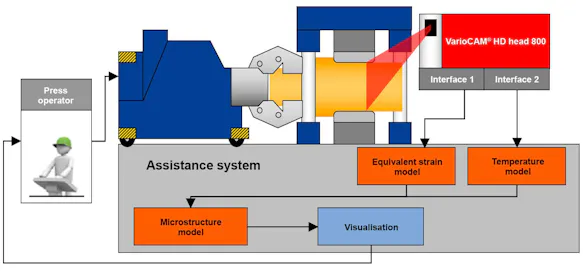
The assistance system developed by the IBF ensures the urgently required reliability in open‐die forging. It is based on the idea of measuring the geometry and temperature of the component and calculating the part properties parallel to the process. For this purpose, various measuring devices, the forging press and the manipulator can be coupled and synchronized with fast models. The actual properties are to be compared with the required properties by means of live calculations. This occurs in a matter of seconds. A simple forging process with four passes, for example, requires a computing time of just one second. If the result deviates from the target parameters, the robot control for the press and manipulator must be adapted. This is repeated until the target values have been reached.
Temperature plays a crucial role in this complex process. If it is too low, the massively acting forces cause cracks to form in the component. On the other hand, excessively high temperatures produce grain growth of the respective material. However, a microstructure with small grain sizes is desired. The forging window, the range of ideal process temperatures, depends heavily on the material. “Demanding materials such as nickel‐based alloys have a forging window of around 50 Kelvin," says Fridtjof Rudolph from the IBF. "The majority of forged products are made from tempered steels that have a forging window of about 300 K.“
The High Spatial Resolution of the Infrared Camera Facilitates Edge Detection
Such framework conditions do not pose a serious challenge for the infrared camera that Fridtjof Rudolph and his colleagues use. The VarioCAM® HD head 800 used with (1,024 x 768) IR pixels from InfraTec has very good thermal sensitivity with which the finest temperature differences can be characterized – thanks to the multi‐characteristic temperature calibration with a measuring accuracy of ± 1 %. The precision optics with a high light intensity of f / 1.0, first‐class transmission, a special coating and minimal distortion prove to be an advantage. Thanks to the combination of a stationary camera, high‐quality optics and image processing software specially designed by the IBF, temperature measurements at a distance of about two meters on the components heated up to 1,200 °C with geometric calculations can be carried out easily with over 20 frames per second. The industrial‐grade light metal housing (IP67) provides excellent protection for the camera against the dust caused by the scale and the steam from hot lubricants.
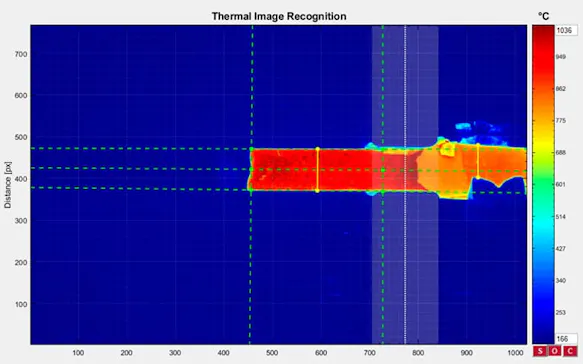
The VarioCAM® HD head 800 is installed in such a way that the workpiece is located as frontal to it as possible. When measuring the surface temperature, the IBF is accommodated by the large‐scale IR detector with over 786,000 measuring pixels of the camera. The enormous resolution ensures that the geometry of the respective measurement object is recorded precisely and the number of measurements can be kept as low as possible. The measured values flow into the calculations of the comparative form changes and a temperature model in sync with the forging process. This temperature model considers factors such as the thermal conduction of the component, convection as well as radiation and cooling of the component due to contact with the tool. The process monitoring is completed by the data on the microstructure of the workpiece calculated for the respective measurement time. In the end, everything results in visual information that the press operator can use to determine how he should further control the forging process.
Sequence of the calculation steps for generating an image for edge detection (Fig. 2):




With the assistance system of the forging industry, the IBF hopes to be able to offer an effective instrument that will further advance the development of open‐die forging. The previous tests of the system have made the scientists optimistic that this project will succeed.
